Me playing After the Rain by Blue Rodeo on piano. This one is real rough in spots. Pushing myself to just get these done and not think about it too much. Will improve over time.
Me playing Dark Angel by Blue Rodeo on piano.
In my article about Getting Your Site to Play Nice with Search Engines and Social Networks I discussed the importance of having canonical URLs for the pages on your site to avoid issues with multiple URLs for the same page causing your page reputation to be divided across the versions. While you can provide a <link rel=”canonical” …> meta tag to achieve this, it’s also good practice to configure your site to redirect the various versions of URLs to the canonical version.
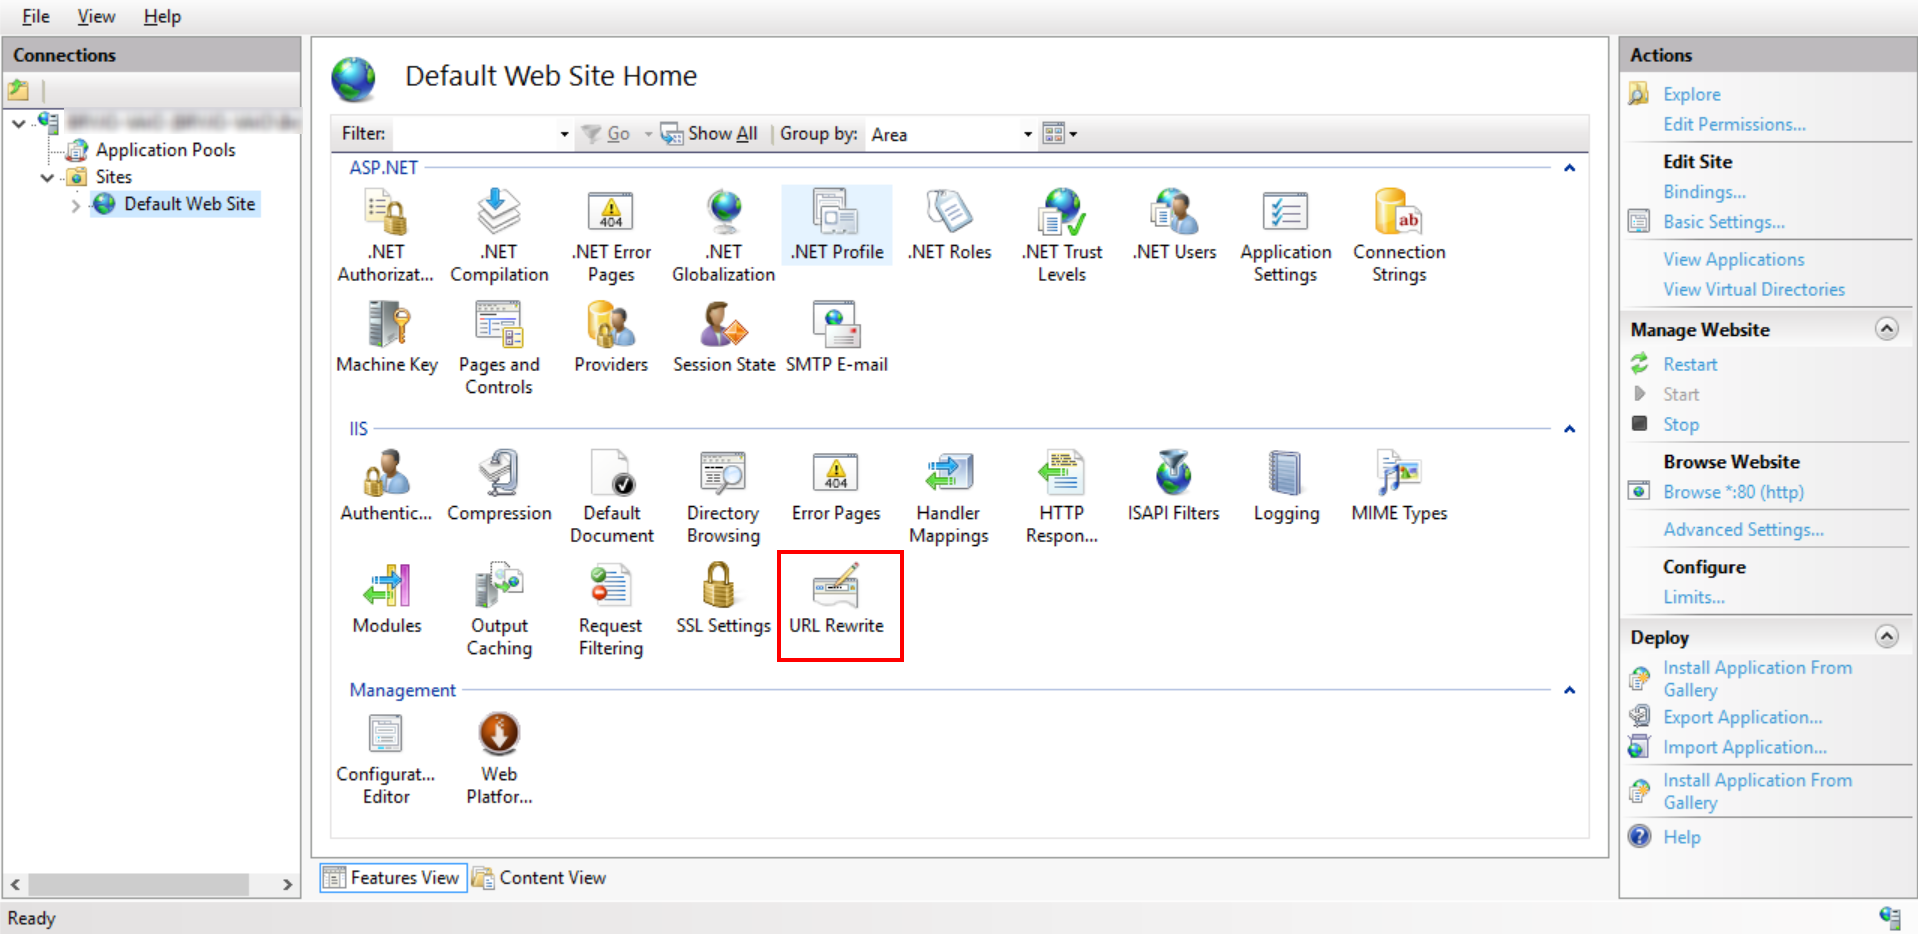
If you are using IIS as your web server, you can implement rules to redirect to canonical URLs with the IIS URL Rewrite Module 2.0. To use this module, download and install it on your web server. Once installed, you will see a URL Rewrite option in Internet Information Services (IIS) Manager when viewing the properties of your site.
The user interface for adding and modifying rules is very straightforward. When creating a new rule you will be presented with a variety of templates to start from for common rewrite cases. When a request is received, all matching rules are executed against your URL in the order in which they are defined. You can adjust the order of the rules. You can also set a property on some rule types to indicate that processing should stop and to not move on to the remaining rules.
Microsoft has documentation on Using URL Rewrite Module 2.0 and the invaluable URL Rewrite Module v2.0 Configuration Reference.
The user interface in IIS Manager saves the settings to the web.config file. I will now go through each of the rewrite rules implemented on the Highway North site with a screen shot of the settings in IIS Manager. At the end I will include the full code for the settings from the web.config file.
Matching patterns in rules can be specified as JavaScript Regular Expressions or wildcards.
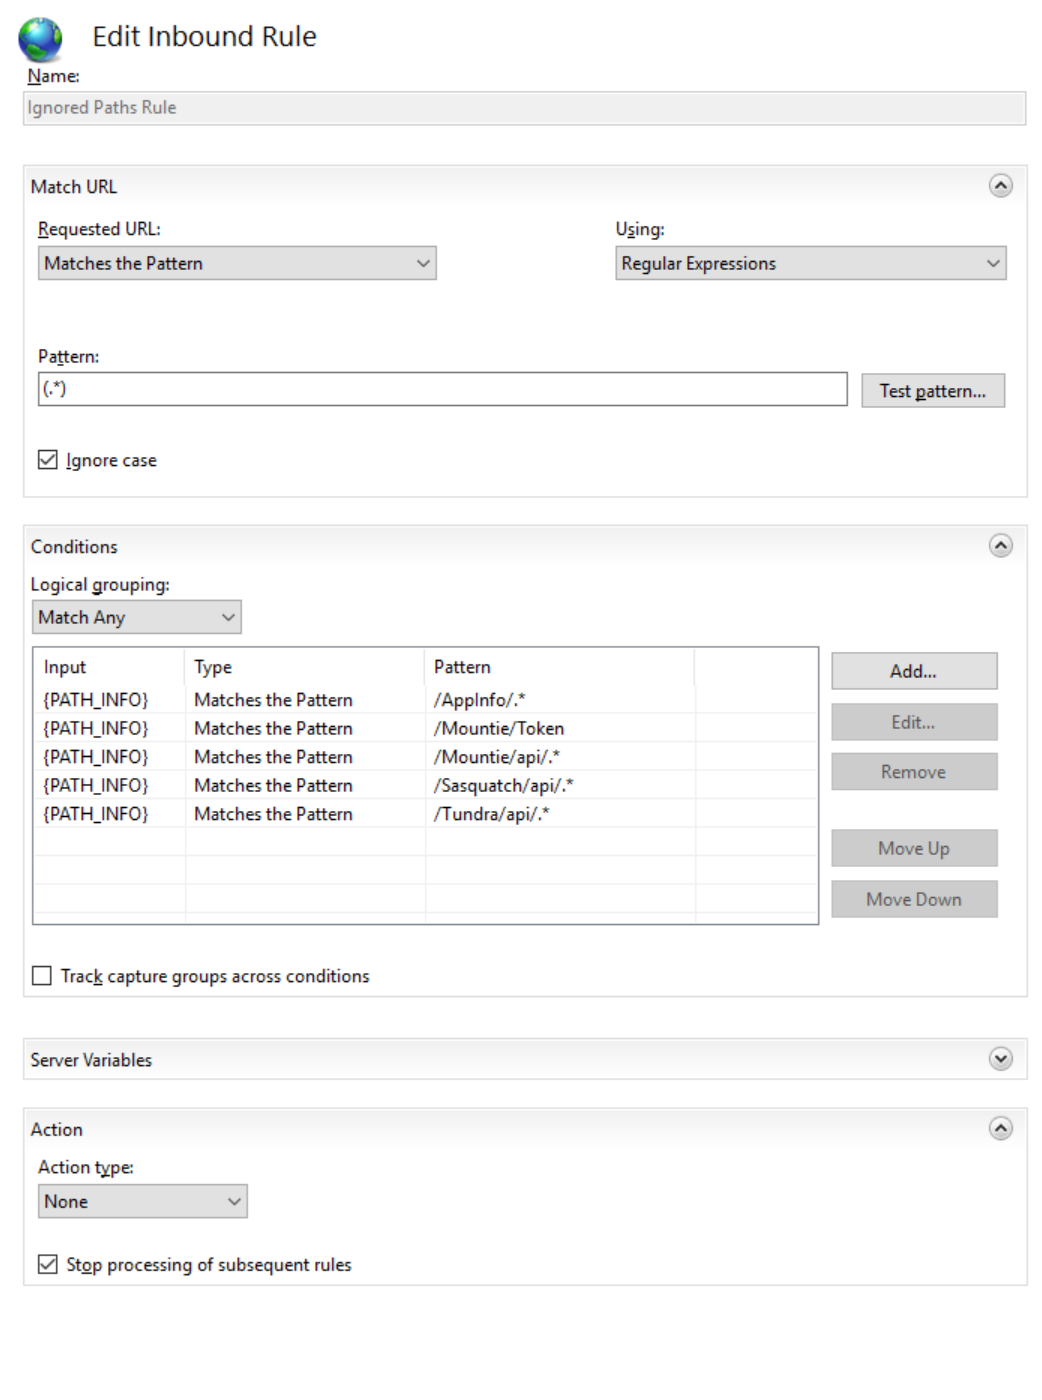
Ignored Paths Rule
There are a few paths on our site that we don’t want to redirect from. For example, we have some URLs that our existing Android applications are expecting to be available and don’t have the ability to redirect from HTTP to HTTPS. The URL Rewrite Module makes available a {PATH_INFO} server variable which includes the path after the protocol prefix and domain name including the forward slash. It’s easy to match the ignored paths to the {PATH_INFO} server variable and set an action type of None (i.e. leave the URL alone) and then stop processing more rules.
| Name |
Ignored Paths Rule |
| Match URL |
Matches the regular expression: (.*) |
| Conditions |
{PATH_INFO} matches any of these regular expressions:
/AppInfo/.*
/Mountie/Token
|
| Action Type |
None |
| Stop processing of subsequent rules |
Yes |
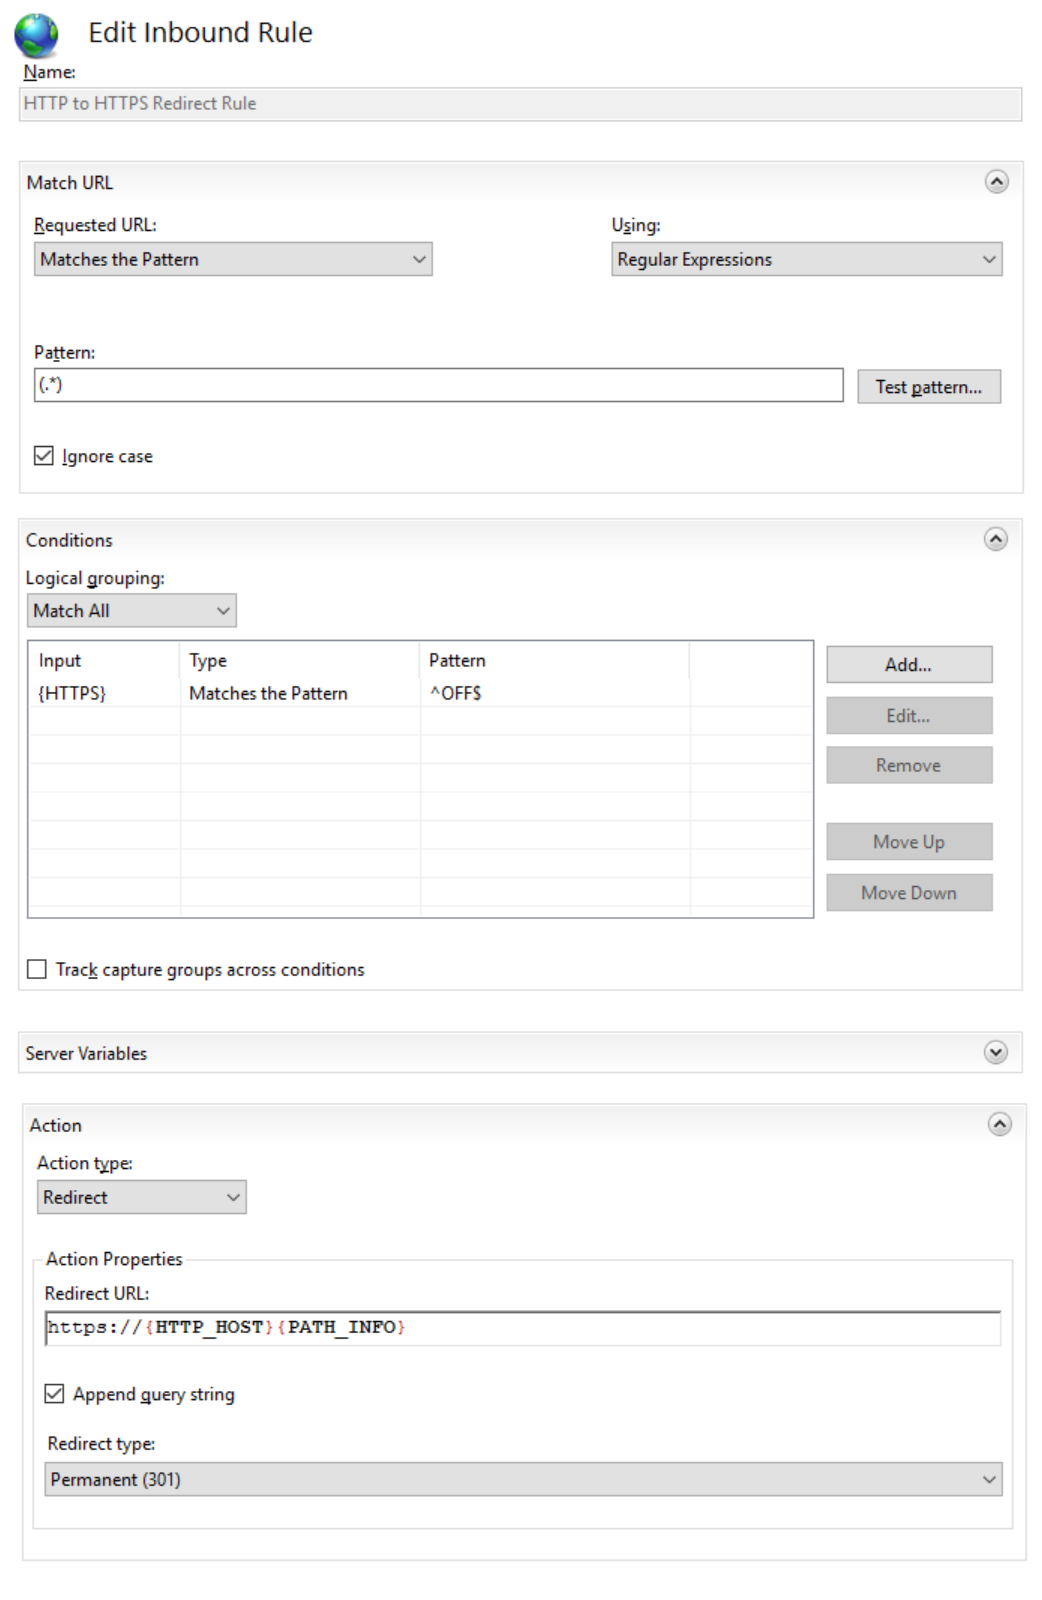
HTTP to HTTPS Redirect Rule
We want to force users of our site to connect with HTTP secure (HTTPS). The URL Rewrite Module makes available an HTTPS server variable set to either ON or OFF to tell us if the URL is using HTTPS.
| Name |
HTTP to HTTPS Redirect Rule |
| Match URL |
Matches the regular expression: (.*) |
| Conditions |
{HTTPS} matches the regular expression: ^OFF$ |
| Action Type |
Redirect |
| Redirect URL |
https://{HTTP_HOST}{PATH_INFO} |
| Append query string |
Yes |
| Redirect Type |
Permanent (301) |
| Stop processing of subsequent rules |
No |
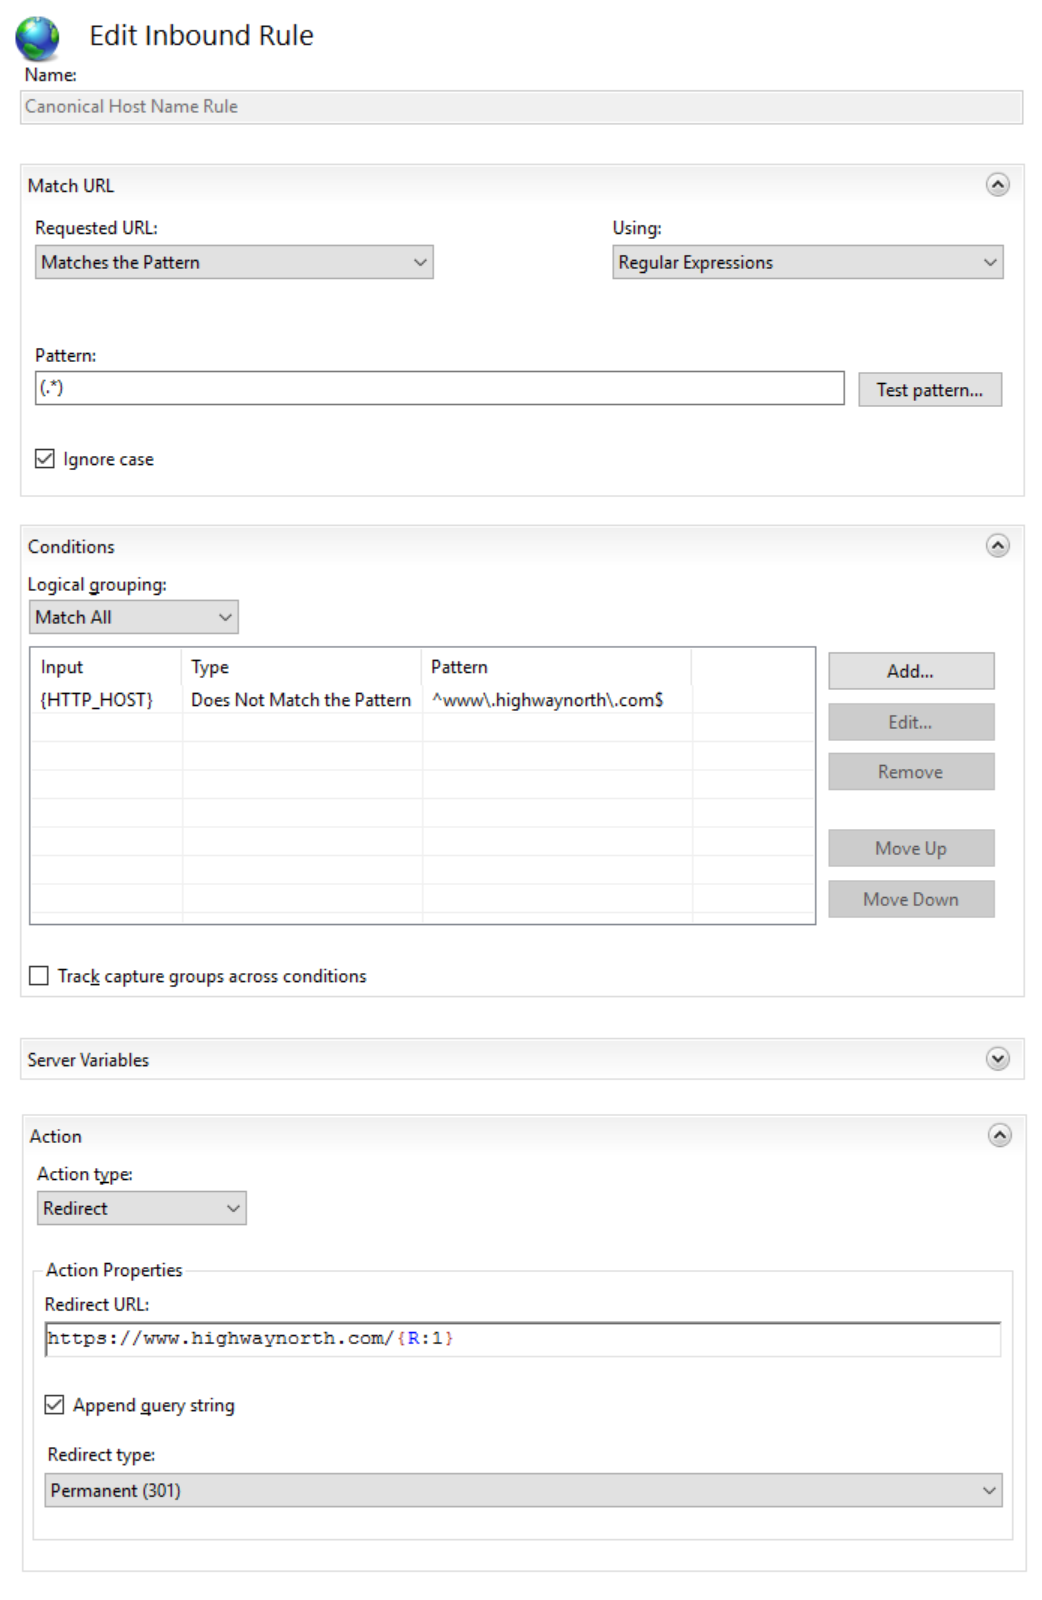
Canonical Host Name Rule
Our site is accessible via both its domain name and via a ‘www’ name. i.e. https://highwaynorth.com and https://www.highwaynorth.com. We choose the ‘www’ version as our preferred version and redirect to it. We can look at the {HTTP_HOST} server variable to determine if our canonical host name was used or not.
| Name |
Canonical Host Name Rule |
| Match URL |
Matches the regular expression: (.*) |
| Conditions |
{HTTP_HOST} does not match the regular expression: ^www\.highwaynorth\.com$ |
| Action Type |
Redirect |
| Redirect URL |
https://www.highwaynorth.com{PATH_INFO} |
| Append query string |
Yes |
| Redirect Type |
Permanent (301) |
| Stop processing of subsequent rules |
No |
Remove Trailing Slash Rule
Whether or not your URLs end with a trailing slash is largely a matter of preference. Because your URL is treated as a separate URL by search engines when it has a trailing slash from when it does not, you should choose the one you prefer and make it canonical. You can add a rule to either add or remove a trailing slash. For our site, our preference is to remove the trailing slash. This can be achieved by matching URLs that end with a trailing slash.
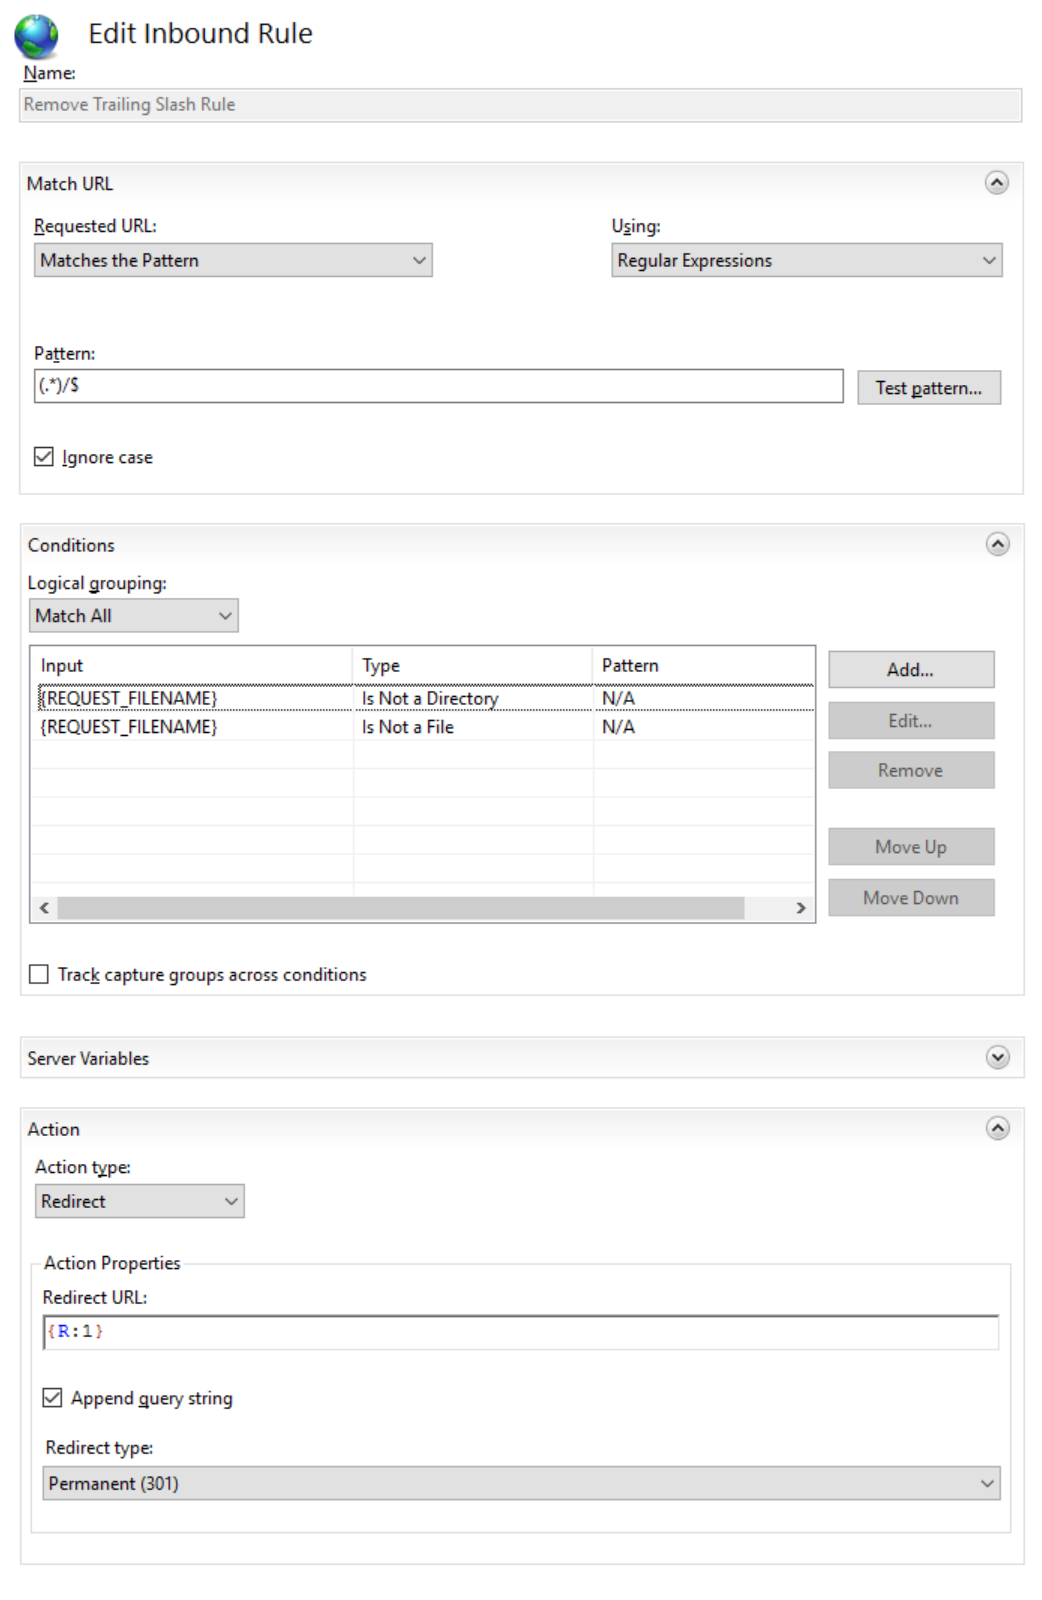
| Name |
Remove Trailing Slash Rule |
| Match URL |
Matches the regular expression: (.*)/$ |
| Conditions |
{REQUEST_FILENAME} is not a directory
{REQUEST_FILENAME} is not a file
|
| Action Type |
Redirect |
| Redirect URL |
{R:1} |
| Append query string |
Yes |
| Redirect Type |
Permanent (301) |
| Stop processing of subsequent rules |
No |
Lower Case Rule
Many sites redirect to an all lower case URL which is important because search engines will treat casing differences as being different URLs. However, for our site, we had too many existing links with mixed case that would now cause lots of redirects to happen. Also, we prefer the readability and look of mixed case URLs when users navigate our site or share links. We decided to accept the risk of our links being shared with mixed case and feel it will be a rare enough scenario not to worry about so we didn’t implement a rule to redirect to all lower case.
Source Code of Rules
Here is the full source code of the above rules as they appear in the web.config file:
<rewrite xdt:Transform="Insert">
<rules>
    <clear />
    <rule name="Ignored Paths Rule" stopProcessing="true">
    <match url="(.*)" />
    <conditions logicalGrouping="MatchAny" trackAllCaptures="false">
        <add input="{PATH_INFO}" pattern="/AppInfo/.*" />
        <add input="{PATH_INFO}" pattern="/Mountie/Token" />
        <add input="{PATH_INFO}" pattern="/Mountie/api/.*" />
        <add input="{PATH_INFO}" pattern="/Sasquatch/api/.*" />
        <add input="{PATH_INFO}" pattern="/Tundra/api/.*" />
    </conditions>
    <action type="None" />
    </rule>
    <rule name="HTTP to HTTPS Redirect Rule">
    <match url="(.*)" negate="false" />
    <conditions logicalGrouping="MatchAll" trackAllCaptures="false">
        <add input="{HTTPS}" pattern="^OFF$" />
    </conditions>
    <action type="Redirect" url="https://{HTTP_HOST}{PATH_INFO}" />
    </rule>
    <rule name="Canonical Host Name Rule">
    <match url="(.*)" />
    <conditions logicalGrouping="MatchAll" trackAllCaptures="false">
        <add input="{HTTP_HOST}" pattern="^www\.highwaynorth\.com$" negate="true" />
    </conditions>
    <action type="Redirect" url="https://www.highwaynorth.com{PATH_INFO}" />
    </rule>
    <rule name="Remove Trailing Slash Rule">
    <match url="(.*)/$" />
    <conditions logicalGrouping="MatchAll" trackAllCaptures="false">
        <add input="{REQUEST_FILENAME}" matchType="IsDirectory" negate="true" />
        <add input="{REQUEST_FILENAME}" matchType="IsFile" negate="true" />
    </conditions>
    <action type="Redirect" url="{R:1}" />
    </rule>
</rules>
</rewrite>
Again, you don’t have to use the IIS Manager interface to configure your rules. Personally, I take the approach of using the UI to configure the rules against a local instance of IIS then copy and paste the code from the generated web.config into our site’s web.config.
I spent some time the last few weeks updating both the Highway North site and my blog to play nice with search engines and social networks. Here are some of the things I implemented.
Meta Tags
There are a couple of helpful tags you can include in the header of your pages to tell search engines how you want your page described in search results and what link should be used to direct people to your site.
Canonical URL
It is common to have multiple URLs leading to the same page within your site. To search engines, these URLs are considered separate and any reputation earned for the page is split across the various versions of the URL. Here are some examples of scenarios where you might have multiple URLs for the same page:
- Site accessible via both its domain name and via a ‘www’ name. e.g. https://highwaynorth.com and https://www.highwaynorth.com
- Site accessible both over HTTP and HTTPS (different URL prefix)
- URL parameters e.g. https://www.highwaynorth.com/contact?sessionid=12345
To solve this, define a canonical URL for your pages. There are a couple of ways you can achieve this:
Description
Adding a description meta tag to the <head> of your page tells search engines a bit more about your page and it also tells search engines how you want the page summarized in search results. There is no guarantee that your description will be used but providing it gives some level of control.
<meta name="description" content="Provide a short description of your site here, 1-3 sentences." />
Open Graph & Twitter Card Tags
There are also a couple sets of tags that give you control over how your pages are described on Facebook and Twitter when people share links to your site.
When you share a link, Facebook and Twitter immediately crawl your page to choose an image and a description to include in the post. Without metadata, these sites make their best guess as to an appropriate image to show from the page and an appropriate description of the content. Sometimes this works OK but in many cases the result is suboptimal. To tell these sites how you want the content described, use Facebook Open Graph and Twitter Cards.
Kissmetrics Blog does a nice job of describing how to use these tags effectively in their article What You Need to Know About Open Graph Meta Tags for Total Facebook and Twitter Mastery.
Note that when setting the og:image tag, you’ll want to specify the URL to an image that is 1200x630 or larger. The image should have a 1.91 ratio.
For Twitter, you can choose either to use a Summary Card with a square thumbnail or a Summary Card with Large Image for a larger wide image. After adding Twitter Card tags to your page, test your URL in the card validator. Validating your URL also seems to whitelist it.
As a reference, here are the canonical URL, description, Open Graph and Twitter Card tags for this article:
<link href="https://www.highwaynorth.com/blogs/bryan/getting-your-site-to-play-nice-with-search-engines-and-social-networks" rel="canonical" />
<meta name="description" content="Sharing some tips on how to get your site to play nice with search engines and social networks by using helpful meta tags and by submitting your sitemap to Google and Bing." />

<meta name="og:title" content="Getting Your Site to Play Nice with Search Engines and Social Networks" />
<meta name="og:site_name" content="Mistakes and All - Bryan Bedard's Blog" />
<meta name="og:url" content="https://www.highwaynorth.com/blogs/bryan/getting-your-site-to-play-nice-with-search-engines-and-social-networks" />
<meta name="og:description" content="Sharing some tips on how to get your site to play nice with search engines and social networks by using helpful meta tags and by submitting your sitemap to Google and Bing." />
<meta name="og:image" content="https://www.highwaynorth.com/static/0000/BryanBedardBlog2.jpg" />
<meta name="og:type" content="article" />
<meta name="og:locale" content="en_US" />

<meta name="twitter:card" content="summary_large_image" />
<meta name="twitter:url" content="https://www.highwaynorth.com/blogs/bryan/getting-your-site-to-play-nice-with-search-engines-and-social-networks" />
<meta name="twitter:title" content="Getting Your Site to Play Nice with Search Engines and Social Networks" />
<meta name="twitter:description" content="Sharing some tips on how to get your site to play nice with search engines and social networks by using helpful meta tags and by submitting your sitemap to Google and Bing." />
<meta name="twitter:image" content="https://www.highwaynorth.com/static/0000/BryanBedardBlog2.jpg" />
Sitemap Registration
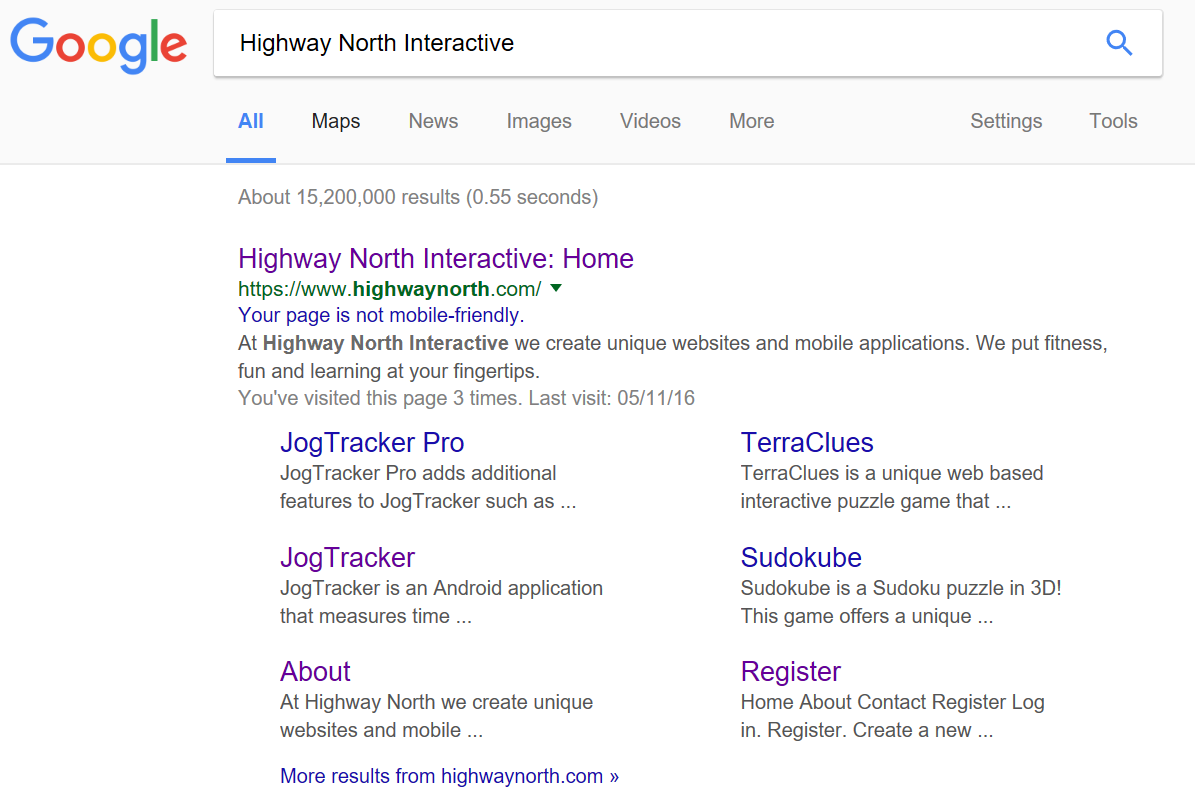
Once search engines know about your site they do a decent job of discovering the pages it contains and figuring out what your site is about and what links are important based on the content and structure of your site. However, they don’t always present your content and sitelinks exactly how you want them to. You can improve how your site is cataloged by providing a sitemap file and registering it within the Google Search Console and Bing Webmaster Tools.
By providing a sitemap it gives you some control over the sitelinks that Google shows in search results for your site. This is how the Highway North site comes up after we submitted a sitemap and it was crawled by Google.
With both Google Search Console and Bing Webmaster Tools you will need to claim ownership of your site. There are a few ways to verify that you own your site. The simple approach I took is to use the option of downloading a verification file and placing it in the root of my site. This proves that you have control over the site. You will need to claim ownership over the various versions of your site (HTTP vs. HTTPS and ‘www’ vs. domain only). With Google Search Console you can indicate which version of your URL is the preferred version.
Google provides excellent guidance on building sitemaps with tips like using consistent, fully-qualified URLs.
Clean Descriptive URLs
Search engines harvest your URLs for information about the page such as keywords and information about the site structure. It’s a best practice to have clean, descriptive URLs without a lot of parameters. For example, when linking to an article, it’s better to have the title of your article in the URL then to have a parameter with an article ID. So,
https://www.highwaynorth.com/blogs/bryan/getting-your-site-to-play-nice-with-search-engines-and-social-networks
is a better choice of URL than
https://www.highwaynorth.com/blogs/bryan?articleid=106
Just sharing a few tips here. Search engine optimization is a big topic and there are several great references available to teach you how such as this Beginner’s Guide to SEO.
Recorded another piano video tonight, November Rain by Guns N' Roses. Recorded a few takes. Messed up in a few spots but this was still the best take so I went with it.