The Unity input system is powerful, flexible and easy to use. It allows you to separate the logical meaning of an input (e.g. move) and the device-specific controls (e.g. key press, game stick). It supports mapping Actions to multiple input devices such as mouse, keyboard and touch. This short article shows how to handle touches. It is not a guide to touch input in general, just the basics of how to handle a touch press on the screen.
As of this writing, when you create a new Unity project, an input action asset is created with pre-defined action maps for player and UI actions. These action maps may meet your needs out of the box.
To handle touches on the screen and detect the position that was touched, you will need to add an action to an action map. Follow these steps.
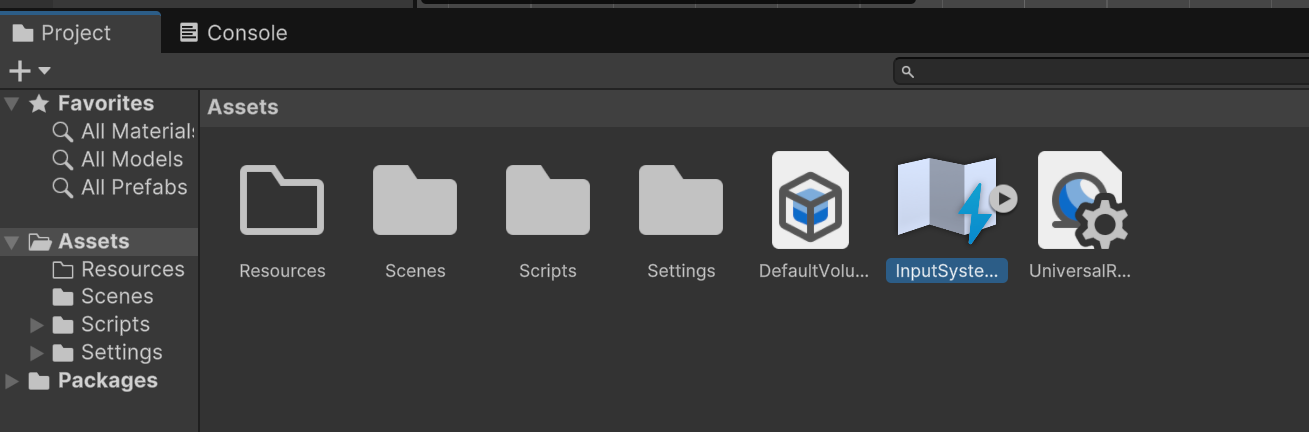
Step 1: Open the Input Actions Asset
Double-click the input actions asset to view and modify the action maps. The default generated input actions file is located in the root of the Assets folder and should be called InputSystem_Actions.inputactions
Step 2: Add an Action to the Action Map
Right-click the Actions box and click Add Action. Name the new action AttackPosition. Right-click the new action and click Add Binding. Select Touchscreen > Position for the Path setting of the binding.
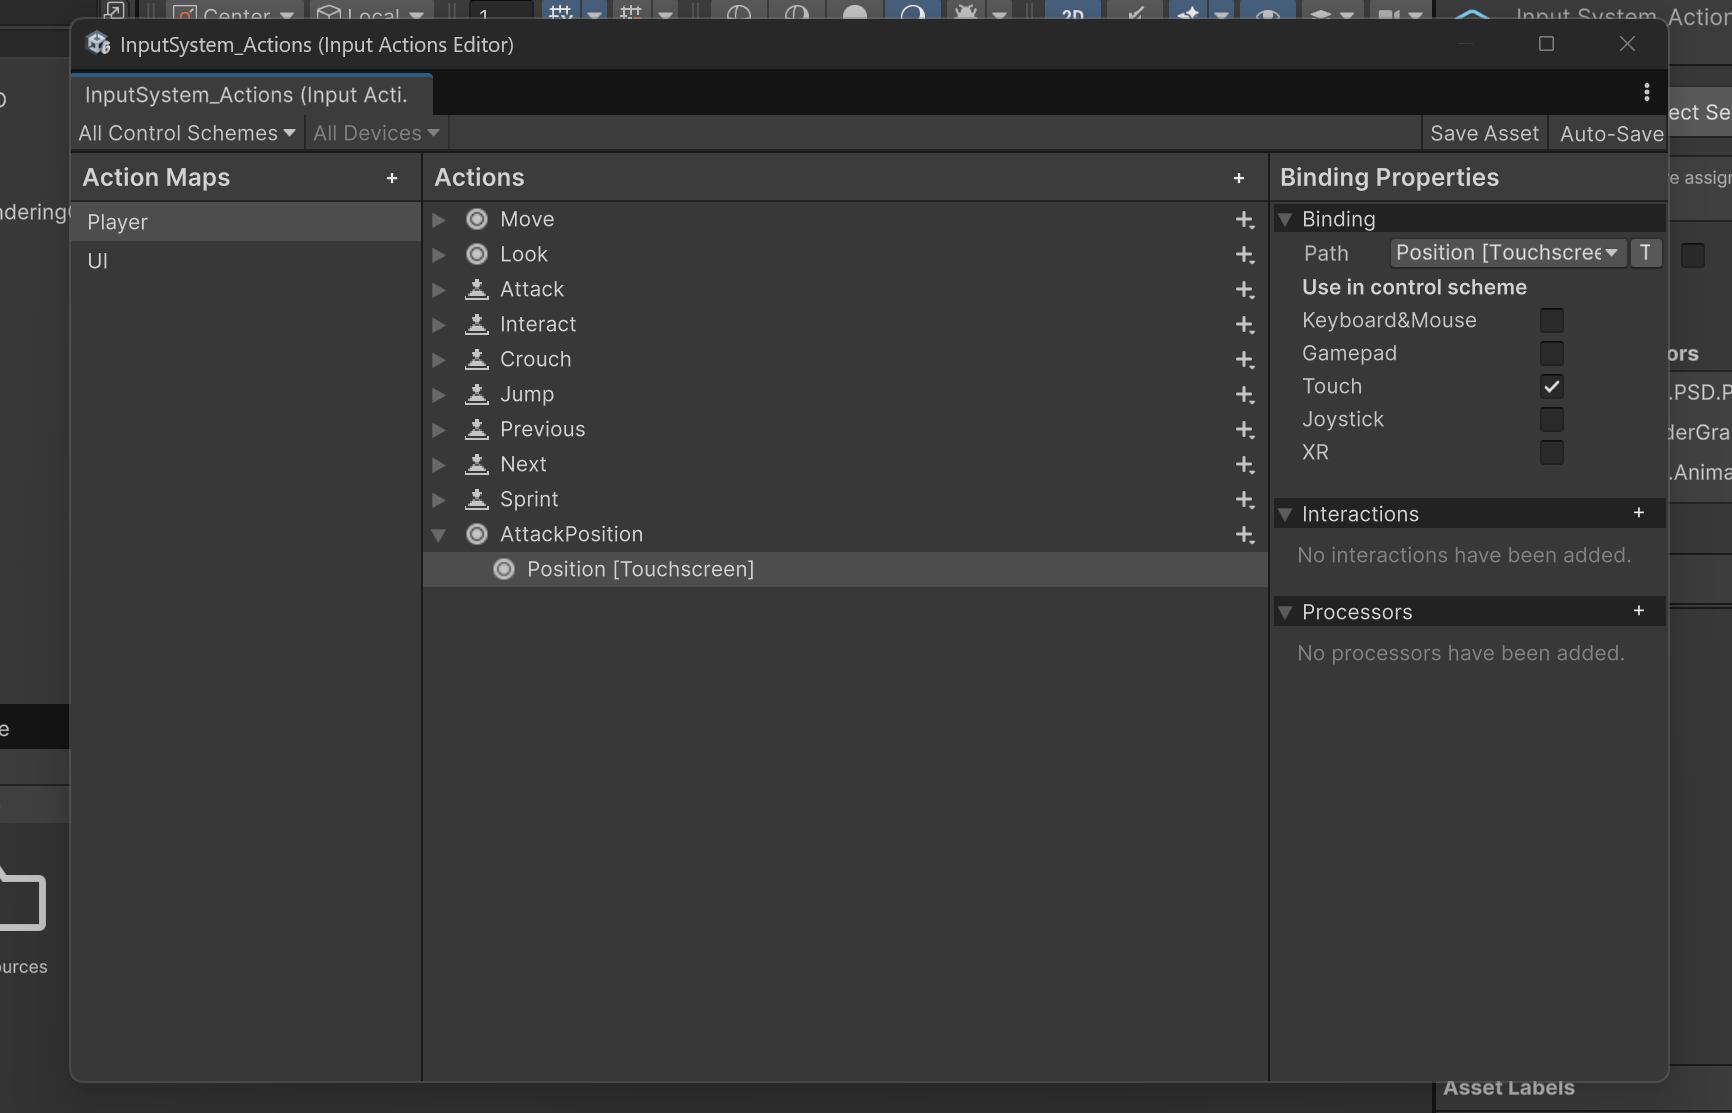
With the Position [touchscreen] binding selected, check the box for Touch in the Use in control scheme section. Click on the AttackPosition action and set Action Type to Value and Control Type to Vector 2. This will configure the action to reeturn a Vector2 value.
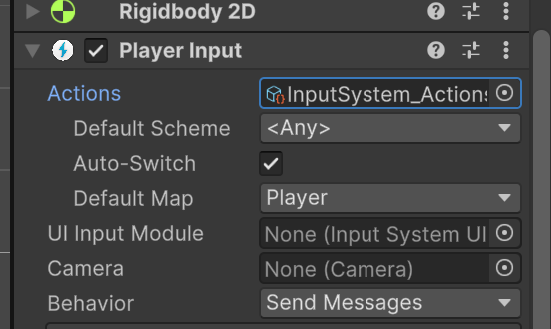
Step 3: Add a Player Input Component to the Player GameObject
The PlayerInput component represents a single player and that player's associated Input Actions. Select the player GameObject in your scene that you want to add touchscreen position input to. Click Add Component in the Inspector window and choose Input > Player Input. Choose InputSystem_Actions for the Actions property of the Player Input component. Leave other properties set to their default values.
Step 4: Add a Script to the Player GameObject to Handle Touch Input
Add a script component to the player GameObject. Edit the script and subscribe to the performed event in the OnEnable method. To subscribe to the event, get a reference to the PlayerInput component and add an event handler to the performed event on the input action named AttackPosition:
private void OnEnable()
{
    var playerInput = GetComponent<PlayerInput>();
    playerInput.actions["AttackPosition"].performed += AttackPosition_performed;
}
Unsubscribe from the event in the OnDisable method:
private void OnDisable()
{
    var playerInput = GetComponent<PlayerInput>();
    playerInput.actions["AttackPosition"].performed -= AttackPosition_performed;
}
Implement the event handler. This example shows how to get the raw touch position in screen coordinates by calling the ReadValue() method on the action named AttackPosition. After reading the value in screen coordinates you can convert to world coordinates if needed:
private void AttackPosition_performed(InputAction.CallbackContext context)
{
    var playerInput = GetComponent<PlayerInput>();
    var attackPositionScreen = playerInput.actions["AttackPosition"].ReadValue();
    Debug.Log("Attack Screen: (" + attackPositionScreen.x + ", " + attackPositionScreen.y + ")");

    var attackPosition = Camera.main.ScreenToWorldPoint(attackPositionScreen);
    Debug.Log("Attack World: (" + attackPosition.x + ", " + attackPosition.y + ")");

}
Use the touch coordinates to take action in your game as desired.
The debugging experience with the Unity player inside the Unity editor is quite good. Many developers use Visual Studio as their script editor for Unity. In Visual Studio you can attach the debugger to Unity and you can set breakpoints in your scripts, step through code and inspect variables. For most testing and debugging it is sufficient to test within the player, even if the game is being built for other platforms such as Android or iOS. However, sometimes the game behaves slightly differently on a particular platform and you may need to test and debug on that platform directly, such as on a mobile device. For Android games, you can connect a device to your development machine with a USB cable and use logcat to inspect debug log output. While not as powerful as being able to set breakpoints, this is a simple way to get visibility into what is happening at runtime in your game.
This article does not cover how to enable debugging on your Android device but you can find other articles easily such as Configure on-device developer options on the Android developer site.
Once you have USB debugging enabled on your device and the Android development tools installed on your development machine, connect your Anrdoid device with a USB cable, open a terminal window and run the Android Debug Bridge (ADB) with these parameters to run logcat on the Android device and output only log messages from Unity:
adb logcat -s Unity
To run adb from any folder on Windows, add the Android platform-tools folder to your PATH system variable. The path to the platform-tools folder will vary depending on where you installed the Android SDK, however it should be something like C:\Users\(YOUR WINDOWS USER NAME)\AppData\Local\Android\Sdk\platform-tools.
In your code, output messages and values of variables to help you debug using the Debug class like this:
Debug.Log("This is a debug message. The value of the name variable is " + name);
Messages output by Debug.Log() will be tagged with an 'I' to indicate that it is an informational message. The Debug class also has methods for LogWarning() and LogError() that are tagged with 'W' and 'E' respectively. Output from logcat can be filtered further to only show the level of logging that you are interested in seeing.
With your device connected and adb logcat running, run the game on your phone and watch for log messages to appear in the terminal window.
Update: After writing this article I found a similar article in the Unity documentation.
I recorded a couple more songs from Phantom of the Opera. I have been experimenting with different settings such as mic placement, gain level on the microphone, audio input level etc. I have also been trying different things to clean up the recordings with CyberLink AudioDirector. Previously I was using the "remove hiss" tool but I found that while it was nice to remove the background hiss, the piano sound became muffled and warped in some places. So, for these I kept the hiss. I am also applying equalizer settings that I came up via some experimentation to try to make the piano sound more natural. Not sure if that is working out but still learning. You be the judge. I will share my recording setup and process for editing the videos in an upcoming blog post.
Think of Me
Think of Me turned out pretty good overall. I recorded two versions, one is a bit slower than the other.
Angel of Music
I was really digging how this one sounded until the very end. Hit a few bad notes in the final chords. You can see my frustration in my facial expressions in the video. Oh well, the blog is called "mistakes and all" right?
A little over a year ago my wife bought me piano book called Re-introduction Etudes by Chilly Gonzales. It's geared towards people who took piano lessons when they were young and want to get back into playing. I got back into playing several years ago but I still thought the book would be useful to me. I really enjoy playing these pieces and I like the way Chilly explains the techniques and the structure of the songs.
I recorded the first five songs. Historically, I have never been good at memorizing songs on the piano. As I work through the Re-introduction Etudes I am making a point to memorize each song to try and get better at this. The recordings are all from memory. I think playing from memory forces me to concentrate a bit more which leads to less mistakes.
Five Spot
Pavane
Pleading the Fifth
Mansbridge
Red Thread
It was not obvious to me how to go about adding an animation to an existing prefab or modify animations associated with an existing prefab. This forum discussion led me to the right answer but I wanted to write a short blog post so I can easily find my way back to this answer in the future when my memory of it becomes foggy.
You can’t directly add animations to a prefab nor modify animations it already has. The only way to do it is to follow these steps:
- Create an instance of your Prefab. (e.g. drag it onto the scene)
- Add/modify animation clips on the instance.
- When finished, drag the instance on top of the original Prefab to replace it with the enhanced object that includes the new or updated animations.